Real-time serverless applications, powered by WebSockets, represent a paradigm shift in web development, enabling instantaneous data exchange and interactive user experiences. This technology facilitates dynamic applications that react in real-time, moving beyond the limitations of traditional request-response cycles. From collaborative tools to live dashboards, the applications of real-time communication are vast and transformative, promising a future where data flows seamlessly and instantly.
This exploration will delve into the intricacies of constructing such applications, examining the fundamental concepts, architectural considerations, and practical implementation strategies. We will dissect the core components, from understanding WebSockets and serverless platforms to authentication, scaling, and advanced features. The objective is to provide a comprehensive understanding, enabling developers to harness the power of real-time serverless architectures effectively.
Introduction to Real-Time Serverless Applications
Real-time applications, characterized by their ability to deliver instantaneous updates and responses, have become indispensable in various digital domains. These applications enable users to interact with data and each other in real-time, fostering a dynamic and responsive user experience. The advent of serverless architecture has further revolutionized the development and deployment of these applications, offering scalability, cost-efficiency, and simplified management.
Real-Time Application Fundamentals
Real-time applications are software programs that provide immediate feedback to user actions or changes in data. Unlike traditional applications that operate on a request-response cycle, real-time systems maintain persistent connections, allowing for the continuous exchange of information. This continuous exchange enables features like live updates, instant messaging, and collaborative editing.
Examples of Real-Time Applications and Use Cases
Numerous applications leverage real-time capabilities to enhance user experience and operational efficiency.
- Chat Applications: Platforms like WhatsApp, Signal, and Slack utilize real-time communication to enable instant messaging, voice calls, and video conferencing. The underlying infrastructure handles the simultaneous transmission of messages, media, and presence information.
- Online Gaming: Multiplayer online games, such as Fortnite and Call of Duty, rely heavily on real-time synchronization to provide a seamless and interactive gaming experience. Game states, player movements, and interactions are constantly updated across all connected clients.
- Financial Trading Platforms: Real-time stock trading platforms provide up-to-the-second market data, allowing traders to make informed decisions based on the latest price fluctuations. The constant stream of data is critical for effective trading.
- Collaborative Editing Tools: Applications like Google Docs and Microsoft Office 365 enable multiple users to simultaneously edit documents in real-time. Changes made by one user are immediately reflected for all others.
- IoT Device Monitoring: Real-time monitoring of Internet of Things (IoT) devices, such as sensors and wearables, provides instant data about device status, performance, and environmental conditions. This is crucial for predictive maintenance and remote control.
- Live Streaming Platforms: Platforms like Twitch and YouTube Live use real-time streaming to deliver live video and audio content to viewers globally. This involves managing high volumes of data and ensuring low latency for a seamless viewing experience.
Advantages of Serverless Architecture for Real-Time Applications
Serverless architecture provides several significant advantages for building and deploying real-time applications. Serverless computing allows developers to focus on code rather than server management, leading to increased efficiency and faster development cycles.
- Scalability: Serverless platforms automatically scale resources based on demand, ensuring that real-time applications can handle fluctuating user loads without manual intervention. This dynamic scaling is critical for applications that experience sudden spikes in traffic. For example, a live streaming platform can scale up resources during peak viewing hours.
- Cost-Effectiveness: Serverless models operate on a pay-per-use basis, eliminating the need to pay for idle server capacity. This can result in significant cost savings, especially for applications with variable workloads.
- Reduced Operational Overhead: Serverless platforms handle server provisioning, management, and patching, freeing developers to focus on application logic. This reduces the burden on operations teams and accelerates development cycles.
- Improved Developer Productivity: Serverless architectures often integrate with other services, such as databases and messaging queues, simplifying the development process and reducing the need for custom infrastructure.
- Enhanced Availability and Reliability: Serverless platforms are designed for high availability, with built-in redundancy and fault tolerance. This ensures that real-time applications remain operational even in the event of infrastructure failures.
Understanding WebSockets
WebSockets represent a pivotal advancement in real-time web communication, enabling persistent, bidirectional communication channels between a client and a server. Unlike the request-response paradigm of HTTP, WebSockets facilitate a continuous flow of data, making them ideal for applications requiring instantaneous updates and interactive user experiences. This section delves into the core mechanics of WebSockets, differentiating them from HTTP and outlining the process that establishes a persistent connection.
WebSocket Fundamentals and HTTP Contrasts
WebSockets provide a full-duplex communication channel over a single TCP connection. This contrasts sharply with HTTP, which operates on a request-response model, where the client initiates a request and the server responds. This difference fundamentally alters how data is exchanged.
- HTTP’s Request-Response Model: In HTTP, the client sends a request to the server, and the server responds with data. Each interaction requires a new connection. This model is suitable for retrieving static content or occasional data updates but is inefficient for real-time applications.
- WebSocket’s Full-Duplex Communication: WebSockets establish a persistent connection. Once established, the client and server can send data to each other at any time, without needing to repeatedly initiate new connections. This two-way communication enables real-time data exchange.
- Overhead Comparison: HTTP involves significant overhead due to the repeated establishment and termination of connections for each request. WebSockets minimize overhead by maintaining a single, long-lived connection. This reduction in overhead contributes to improved performance and lower latency, crucial for real-time applications.
- Protocol Differences: HTTP uses text-based protocols, making it human-readable but less efficient. WebSockets utilize a binary protocol, which can be more efficient for transmitting data, especially large datasets.
The WebSocket Handshake Process
The WebSocket handshake is the initial process that upgrades an HTTP connection to a WebSocket connection. This process ensures compatibility and establishes the persistent communication channel. It involves specific headers and a coordinated exchange between the client and the server.
- Client Request (Initial HTTP Request): The client initiates the WebSocket handshake by sending a regular HTTP request to the server. This request includes specific headers to indicate the client’s intention to upgrade to a WebSocket connection.
- Key Headers: The client’s HTTP request includes crucial headers.
Upgrade: websocketindicates the client’s desire to upgrade the connection.Connection: Upgradesignifies that the connection should be upgraded.Sec-WebSocket-Key: [Base64 encoded value]provides a randomly generated key used for security and to establish the WebSocket connection.Sec-WebSocket-Protocol: [protocol name]specifies the sub-protocol, if any, for the WebSocket communication.Sec-WebSocket-Version: 13specifies the WebSocket protocol version (usually version 13).
- Server Response (HTTP 101 Switching Protocols): The server, upon receiving the client’s upgrade request, validates the headers and responds if it supports WebSockets. The server sends a
101 Switching ProtocolsHTTP status code, signaling the successful upgrade. - Server Response Headers: The server’s response includes key headers:
Upgrade: websocketconfirms the upgrade.Connection: Upgradeconfirms the connection upgrade.Sec-WebSocket-Accept: [Base64 encoded value]: The server calculates a response key based on the client’s key and a predefined GUID. This ensures that the server understands and is willing to use the WebSocket protocol. The server computes the Sec-WebSocket-Accept value by concatenating the client’s Sec-WebSocket-Key with the globally unique identifier (GUID) “258EAFA5-E914-47DA-95CA-C5AB0DC85B11” and then computing a SHA-1 hash and base64 encoding the result.
- Connection Establishment: Once the handshake is complete, the TCP connection is upgraded to a WebSocket connection. Both the client and the server can now send and receive data frames through the established persistent channel.
Basic WebSocket Communication Diagram
The following diagram illustrates the basic communication flow between a client and a server using WebSockets. The diagram emphasizes the handshake and the subsequent bidirectional data exchange.
Diagram Description:
The diagram illustrates the WebSocket handshake and subsequent data exchange. It shows a client and a server as separate entities.
- Step 1: Initial HTTP Request (Client to Server): The client initiates the process by sending an HTTP request to the server. This request includes the necessary headers to indicate the intention to upgrade to a WebSocket connection. The request is labeled as “HTTP Request (Upgrade)”.
- Step 2: Server Response (Server to Client): The server receives the request and, if it supports WebSockets, responds with an HTTP response that confirms the upgrade. This response includes the
101 Switching Protocolsstatus code and headers indicating the WebSocket connection’s establishment. The response is labeled as “HTTP Response (101 Switching Protocols)”. - Step 3: WebSocket Connection Established: After the handshake, a persistent WebSocket connection is established between the client and the server. This connection is represented by a line connecting the client and the server.
- Step 4: Data Exchange (Bidirectional): Once the connection is established, the client and the server can send data to each other. This bidirectional data exchange is represented by arrows pointing in both directions, labeled “Data Frame” to indicate that data is being sent and received.
The diagram effectively shows the transition from a standard HTTP request-response model to the continuous, bidirectional communication enabled by WebSockets.
Choosing a Serverless Platform
Selecting the appropriate serverless platform is crucial for the successful deployment and operation of a real-time WebSocket application. The platform’s capabilities, pricing model, and limitations directly impact scalability, performance, and cost-effectiveness. Careful consideration of these factors is essential to optimize the application’s architecture and ensure it meets the specific requirements of the project. This section will analyze the leading serverless platforms, comparing their features and constraints to guide informed decision-making.
Popular Serverless Platforms for WebSocket Applications
Several serverless platforms offer robust support for WebSocket applications, each with its strengths and weaknesses. The choice of platform depends heavily on the application’s scale, expected traffic, budget, and integration requirements with other services. Understanding the capabilities of each platform is vital for selecting the optimal solution.
- Amazon Web Services (AWS): AWS provides a comprehensive suite of services, including API Gateway, Lambda, and EventBridge, that can be integrated to build and manage WebSocket applications. AWS offers high scalability, extensive features, and a mature ecosystem, making it a popular choice for large-scale deployments.
- Microsoft Azure: Azure offers Azure Functions and Azure SignalR Service, designed to simplify the development and deployment of real-time applications. Azure’s strengths lie in its strong integration with other Microsoft services and its competitive pricing model.
- Google Cloud Platform (GCP): GCP provides Cloud Functions, Cloud Run, and Firebase for building and managing WebSocket applications. GCP excels in its advanced analytics and machine learning capabilities, along with its competitive pricing and global infrastructure.
Platform Feature Comparison
A detailed comparison of the features, pricing, and limitations of AWS, Azure, and GCP is presented below. This table facilitates a side-by-side analysis, enabling a well-informed decision-making process. This comparison considers key aspects like WebSocket support, scaling capabilities, pricing models, and any specific limitations of each platform.
| Feature | AWS | Azure | Google Cloud |
|---|---|---|---|
| WebSocket Support | API Gateway with WebSocket APIs, Lambda functions for backend logic. | Azure SignalR Service, Azure Functions for backend logic. | Firebase Realtime Database, Cloud Functions for backend logic. |
| Scaling | Automatic scaling based on traffic; Lambda functions scale on demand. API Gateway auto-scales. | Azure SignalR Service auto-scales; Azure Functions scale based on triggers. | Cloud Functions auto-scale; Cloud Run offers containerized scaling. |
| Pricing Model | Pay-per-use for API Gateway and Lambda. Data transfer costs apply. | Pay-per-connection for Azure SignalR Service. Azure Functions are pay-per-use. | Pay-per-use for Cloud Functions and Cloud Run. Data transfer costs apply. |
| Limitations | API Gateway has connection timeout limits; Lambda function execution time limits. | Azure SignalR Service has scaling limits based on the chosen tier. | Cloud Functions execution time limits; Firebase Realtime Database has data storage limits based on the chosen plan. |
| Integration with other services | Excellent integration with other AWS services (e.g., S3, DynamoDB, SQS, EventBridge). | Seamless integration with other Azure services (e.g., Cosmos DB, Azure Storage, Event Grid). | Strong integration with other GCP services (e.g., Cloud Storage, Cloud Firestore, Pub/Sub). |
| Example Use Cases | Real-time chat applications, live dashboards, IoT device communication. | Live collaboration tools, gaming applications, financial data streaming. | Real-time data analytics, social media feeds, interactive web applications. |
Setting Up Serverless Functions
Serverless functions are the cornerstone of real-time serverless applications, providing the computational power needed to handle WebSocket connections and process real-time data. This section Artikels the practical steps involved in deploying serverless functions and managing WebSocket interactions within them. The focus will be on practical implementation, using common programming languages and demonstrating essential code snippets.
Deploying Serverless Functions
Deploying serverless functions typically involves several key steps, regardless of the chosen platform. The specific commands and configurations may vary, but the underlying principles remain consistent.
- Choose a Serverless Platform: Select a platform such as AWS Lambda, Google Cloud Functions, or Azure Functions. Each platform offers different pricing models, supported languages, and integration capabilities. The choice often depends on existing infrastructure and specific requirements.
- Develop the Function Code: Write the function code using a supported language. This code will handle WebSocket connections, message processing, and any other logic required by the application. The code will typically be structured to handle events triggered by WebSocket activity.
- Package the Code: Package the code into a deployment artifact. This might involve creating a zip file containing the code and any necessary dependencies. For more complex projects, build tools and dependency management systems are essential.
- Configure the Function: Configure the function on the serverless platform. This includes specifying the function’s name, memory allocation, execution timeout, and any environment variables. The configuration also defines the trigger, which in this case will be related to WebSocket events.
- Deploy the Function: Deploy the function using the platform’s CLI or web interface. This uploads the deployment artifact and configures the function to be ready for execution. The deployment process also typically involves setting up access permissions.
- Test the Function: Test the function to ensure it’s working as expected. This involves sending WebSocket messages and verifying that the function processes them correctly and returns the appropriate responses. Testing is crucial to identify and fix any issues.
Handling WebSocket Connections in Serverless Functions
Handling WebSocket connections within a serverless function requires specific code to manage the connection lifecycle and message exchange. The function must be able to accept incoming connections, process messages, and send responses.
- Connection Establishment: When a client initiates a WebSocket connection, the serverless function needs to accept the connection and establish a persistent communication channel. This typically involves an initial handshake.
- Message Handling: Once the connection is established, the function needs to handle incoming messages from the client. This involves parsing the message, processing it according to the application logic, and generating a response.
- Message Sending: The function must be able to send messages back to the connected clients. This can be used to provide real-time updates, acknowledge messages, or send data in response to client requests.
- Connection Closure: When a client disconnects, or the function needs to close the connection, it must handle the disconnection gracefully, releasing any associated resources.
Code Snippets for Basic Connection Establishment and Message Handling (Node.js)
The following code snippets provide a basic illustration of how to handle WebSocket connections and messages within a Node.js serverless function, using a hypothetical WebSocket library or framework (e.g., ws, socket.io). These examples assume the existence of a suitable WebSocket library.
Connection Establishment:
const WebSocket = require('ws');exports.handler = async (event, context) => if (event.requestContext.connectionId) // Handle WebSocket connect event console.log('Client connected:', event.requestContext.connectionId); return statusCode: 200 ; ; Explanation: The code snippet defines a handler function that is triggered by the WebSocket connect event. The `event.requestContext.connectionId` provides the unique identifier for the WebSocket connection. The function logs the connection and returns a 200 status code to acknowledge the connection. This demonstrates the initial setup of a WebSocket connection.
Message Handling:
const WebSocket = require('ws');exports.handler = async (event, context) => if (event.requestContext.connectionId) // Handle WebSocket connect event (as above) console.log('Client connected:', event.requestContext.connectionId); return statusCode: 200 ; else if (event.body) // Handle WebSocket message event const message = JSON.parse(event.body); console.log('Received message:', message); // Process the message and generate a response const response = message: `Server received: $message.data`, ; // Send the response back to the client (using a hypothetical API) // This assumes an API gateway integration to send messages. const apigwManagementApi = new AWS.ApiGatewayManagementApi( apiVersion: '2018-11-29', endpoint: event.requestContext.domainName + '/' + event.requestContext.stage ); try await apigwManagementApi.postToConnection( ConnectionId: event.requestContext.connectionId, Data: JSON.stringify(response) ).promise(); catch (e) console.log("Error sending message:", e); return statusCode: 200 ; ; Explanation: This snippet extends the previous example to handle incoming messages. It checks if `event.body` contains data, which indicates a message event. It parses the message, processes it, generates a response, and then uses a hypothetical API to send the response back to the client via the WebSocket connection. The `event.requestContext.connectionId` is used to identify the target connection.
This illustrates basic message processing and response sending.
Note: The `AWS.ApiGatewayManagementApi` object and related code for sending messages back to the client are specific to AWS and its API Gateway service. Similar approaches would be required on other platforms, using their respective APIs or SDKs for WebSocket management.
Implementing WebSocket Connections
Establishing and managing WebSocket connections is a critical component of any real-time serverless application. This involves the client-side implementation, error handling, and strategies for maintaining a persistent, bi-directional communication channel. Successful implementation ensures that real-time data updates are delivered promptly and reliably.
Establishing WebSocket Connections from the Client-Side
Initiating a WebSocket connection on the client-side involves several key steps, primarily using JavaScript in a web browser environment. This process leverages the WebSocket API to establish a persistent connection to the server.The fundamental process is as follows:
1. Instantiation of the WebSocket Object
A new `WebSocket` object is created, passing the WebSocket server’s URL as an argument. This URL typically starts with `ws://` (unencrypted) or `wss://` (encrypted). For example: “`javascript const socket = new WebSocket(‘wss://your-server-endpoint.com’); “`
2. Event Listeners
The WebSocket object then uses event listeners to manage the connection lifecycle and data exchange. The primary events include:
`open`
Triggered when the connection is successfully established.
`message`
Triggered when a message is received from the server.
`close`
Triggered when the connection is closed.
`error`
Triggered when an error occurs during the connection or communication.
3. Sending Data
Data is sent to the server using the `send()` method of the WebSocket object. This method accepts a string as an argument. For instance: “`javascript socket.send(‘Hello Server!’); “`
4. Receiving Data
The `message` event listener is used to receive data from the server. The event object provides access to the received data through its `data` property. The received data can be parsed and processed as needed. “`javascript socket.addEventListener(‘message’, (event) => const message = event.data; console.log(‘Received:’, message); ); “`
5. Closing the Connection
The `close()` method is used to terminate the WebSocket connection. This is crucial for resource management and to avoid unnecessary server-side processing. “`javascript socket.close(); “`
Handling Connection Errors and Reconnections
Implementing robust error handling and reconnection strategies is crucial for maintaining a reliable real-time application. This involves anticipating potential connection failures and implementing mechanisms to automatically re-establish the connection.The following are the techniques for error handling and reconnection:
1. Error Event Handling
The `error` event listener should be used to catch and handle any connection errors. These errors can be caused by network issues, server-side problems, or other unexpected circumstances. Appropriate error handling can prevent the application from crashing and provide a better user experience. “`javascript socket.addEventListener(‘error’, (event) => console.error(‘WebSocket error:’, event); // Implement reconnection logic here ); “`
2. Close Event Handling
The `close` event provides information about the reason for the connection closure, including a status code and a reason string. Analyzing these details can help in determining the appropriate reconnection strategy. For example, a status code of 1000 indicates a normal closure, while codes like 1006 often indicate a network issue. “`javascript socket.addEventListener(‘close’, (event) => console.log(‘WebSocket closed:’, event.code, event.reason); // Implement reconnection logic here ); “`
3. Reconnection Strategies
When a connection is closed or an error occurs, the client should attempt to reconnect to the server. Common strategies include:
Immediate Reconnect
Attempting to reconnect immediately after a failure. This can be effective for transient network issues.
Exponential Backoff
Increasing the delay between reconnection attempts. This strategy is useful to prevent overwhelming the server during prolonged outages. The delay typically increases exponentially with each failed attempt (e.g., 1 second, 2 seconds, 4 seconds, 8 seconds). “`javascript let reconnectAttempts = 0; const maxReconnectAttempts = 5; const reconnectDelay = (attempt) => Math.min(30, Math.pow(2, attempt))
1000; // Exponential backoff up to 30 seconds
const reconnect = () => if (reconnectAttempts < maxReconnectAttempts) setTimeout(() => console.log(‘Attempting to reconnect…’); // Re-instantiate the WebSocket and set up event listeners // (as shown in the initial connection example) reconnectAttempts++; , reconnectDelay(reconnectAttempts)); else console.error(‘Max reconnect attempts reached. Giving up.’); // Notify the user or take other appropriate action ; “`
Randomized Delay
Introducing a random delay before reconnection attempts to avoid synchronized reconnection attempts from multiple clients.
4. Heartbeat Mechanism
Implementing a heartbeat mechanism, where the client periodically sends a small message to the server to keep the connection alive. The server responds to the heartbeat, confirming that the connection is still active. If the server doesn’t respond within a certain time, the client can assume the connection has been lost and initiate a reconnection.
Client-Side Implementation
The client sends a “ping” message every 30 seconds: “`javascript let pingInterval; const startHeartbeat = () => pingInterval = setInterval(() => if (socket.readyState === WebSocket.OPEN) socket.send(JSON.stringify( type: ‘ping’ )); // Or a simple ‘ping’ string , 30000); // 30 seconds ; const stopHeartbeat = () => clearInterval(pingInterval); ; “`
Server-Side Implementation
The server receives the “ping” message and responds with a “pong” message. If the server doesn’t receive a “ping” within a certain time (e.g., 60 seconds), it closes the connection.
5. Connection State Awareness
Maintaining awareness of the current connection state (e.g., `CONNECTING`, `OPEN`, `CLOSING`, `CLOSED`) is essential. This information can be used to prevent sending data over a closed connection or to manage the reconnection process appropriately. The `readyState` property of the `WebSocket` object provides this information.
Implementing a Client-Side Library for WebSocket Communication
Developing a client-side library simplifies WebSocket communication, providing a more abstract and user-friendly interface. This library can encapsulate the connection management, error handling, and message formatting, making it easier to integrate WebSocket functionality into an application.The structure of a client-side library can be organized as follows:
1. Connection Management
The library should handle the creation, opening, and closing of the WebSocket connection. It should also manage reconnection attempts and the heartbeat mechanism.
Abstraction of the `WebSocket` Object
Wrap the native `WebSocket` object to provide a more convenient API. “`javascript class WebSocketClient constructor(url) this.url = url; this.socket = null; this.reconnectAttempts = 0; this.maxReconnectAttempts = 5; this.reconnectDelay = 1000; // Initial delay in milliseconds this.messageHandlers = ; this.heartbeatInterval = null; this.heartbeatTimeout = 60000; // 60 seconds “`
2. Event Handling
The library should provide methods for registering and handling events, such as `open`, `message`, `close`, and `error`. This allows the application to respond to various WebSocket events in a structured way.
Event Listener Abstraction
Create methods to register event listeners, encapsulating the native `addEventListener` calls. “`javascript class WebSocketClient … on(event, callback) this.messageHandlers[event] = callback; …
“`
Internal Event Handling
Within the library, the `WebSocket` events are intercepted and passed to the registered event handlers. “`javascript class WebSocketClient … connect() this.socket = new WebSocket(this.url); this.socket.onopen = () => this.reconnectAttempts = 0; if (this.messageHandlers.open) this.messageHandlers.open(); this.startHeartbeat(); ; this.socket.onmessage = (event) => if (this.messageHandlers.message) this.messageHandlers.message(event.data); ; this.socket.onclose = (event) => if (this.messageHandlers.close) this.messageHandlers.close(event); this.stopHeartbeat(); this.reconnect(); ; this.socket.onerror = (error) => if (this.messageHandlers.error) this.messageHandlers.error(error); this.stopHeartbeat(); this.reconnect(); ; …
“`
3. Message Formatting and Serialization
The library can handle message formatting, such as converting JavaScript objects to JSON strings before sending them to the server and parsing JSON responses from the server.
`send()` Method
Implement a `send()` method to serialize data before sending. “`javascript class WebSocketClient … send(data) if (this.socket && this.socket.readyState === WebSocket.OPEN) this.socket.send(JSON.stringify(data)); else console.error(‘WebSocket is not open.’); …
“`
Deserialization in `onmessage`
Parse the received data in the `onmessage` handler. “`javascript class WebSocketClient … connect() this.socket.onmessage = (event) => try const data = JSON.parse(event.data); if (this.messageHandlers.message) this.messageHandlers.message(data); catch (e) console.error(‘Error parsing message:’, e); ; …
“`
4. Reconnection Logic
The library should implement the reconnection strategies discussed earlier, such as exponential backoff, to automatically re-establish the connection in case of failures.
`reconnect()` Method
Implement a `reconnect()` method that is called when the connection is closed or an error occurs. “`javascript class WebSocketClient … reconnect() if (this.reconnectAttempts < this.maxReconnectAttempts) const delay = this.reconnectDelay- Math.pow(2, this.reconnectAttempts); console.log(`Reconnecting in $delay / 1000 seconds...`); setTimeout(() => this.connect(); this.reconnectAttempts++; , delay); else console.error(‘Max reconnect attempts reached.’); …
“`
5. Heartbeat Implementation
The library should handle the heartbeat mechanism to ensure the connection stays active.
`startHeartbeat()` and `stopHeartbeat()` methods
Implement methods to start and stop the heartbeat interval. “`javascript class WebSocketClient … startHeartbeat() this.heartbeatInterval = setInterval(() => if (this.socket && this.socket.readyState === WebSocket.OPEN) this.send( type: ‘ping’ ); , 30000); // Send ping every 30 seconds stopHeartbeat() clearInterval(this.heartbeatInterval); …
“`
Server Acknowledgement
The server needs to respond to the “ping” message with a “pong” message. The client-side library should monitor the lack of a “pong” response within a certain time to trigger a reconnection.
6. Usage Example
“`javascript // Instantiate the WebSocket client const client = new WebSocketClient(‘wss://your-server-endpoint.com’); // Register event handlers client.on(‘open’, () => console.log(‘Connected to WebSocket server’); client.send( type: ‘subscribe’, channel: ‘news’ ); ); client.on(‘message’, (message) => console.log(‘Received message:’, message); ); client.on(‘close’, (event) => console.log(‘Disconnected from WebSocket server’, event); ); client.on(‘error’, (error) => console.error(‘WebSocket error:’, error); ); // Connect to the server client.connect(); “`This structured approach allows developers to create robust, maintainable, and user-friendly real-time applications with serverless backends.
Message Handling and Data Transmission

Real-time serverless applications rely heavily on efficient message handling and data transmission over WebSockets. This section details the core techniques used to send and receive messages, along with the various data formats that facilitate seamless communication between clients and the serverless backend. Understanding these aspects is crucial for building responsive and scalable real-time applications.
Sending and Receiving Messages
The exchange of messages over WebSockets is a fundamental aspect of real-time communication. It enables bidirectional communication, where both the client and server can initiate the transfer of data at any time.The process involves two primary operations:
- Sending Messages: The client or server can send messages to the other endpoint. This typically involves constructing a message and sending it over the established WebSocket connection.
- Receiving Messages: Both the client and server must be able to listen for and receive incoming messages. This often involves setting up event listeners that trigger specific actions when a message is received.
The structure of the message itself is crucial. It generally includes the data to be transmitted and potentially metadata such as message type or a unique identifier. Efficient message handling ensures minimal latency and maximum throughput, directly impacting the perceived responsiveness of the real-time application. The choice of message structure, data format, and message handling mechanisms significantly impacts the application’s performance and scalability.
Data Formats in WebSocket Communication
WebSockets support the transmission of data in various formats, with JSON (JavaScript Object Notation) being the most commonly used. The choice of data format affects the size of the transmitted data, the complexity of parsing, and the efficiency of processing on both the client and server sides.Here’s a breakdown of some common data formats:
- JSON (JavaScript Object Notation): JSON is a lightweight data-interchange format that is easy for humans to read and write and easy for machines to parse and generate. It is the preferred format for most WebSocket applications due to its simplicity and widespread support in various programming languages and platforms. JSON uses a key-value pair structure to represent data.
- Text: Plain text can be used for simple messages, but it is less structured than JSON. It is often used for basic communication where the data does not require complex formatting.
- Binary: Binary data is suitable for transmitting raw data, such as images, audio, or video files. Binary data is more efficient than text or JSON for transmitting large files, as it avoids the overhead of text encoding. However, parsing and handling binary data requires specific handling and encoding/decoding on both the client and server.
The selection of a suitable data format is critical for optimizing WebSocket communication. Consider the complexity of the data, the performance requirements, and the target platforms when choosing a data format. JSON is often the best starting point due to its versatility and ease of use, while binary formats are best used for large data payloads where performance is critical.
Code Samples: Formatting and Transmitting Data
The following code samples demonstrate how to format and transmit data using JSON in a serverless environment with JavaScript on the client side and Node.js on the server-side. Client-side (JavaScript):“`javascript// Establish a WebSocket connectionconst socket = new WebSocket(‘ws://your-server-endpoint’);// Event listener for successful connectionsocket.addEventListener(‘open’, (event) => console.log(‘WebSocket connection established’); // Example: Send a JSON message const message = type: ‘message’, text: ‘Hello, server!’, timestamp: Date.now() ; socket.send(JSON.stringify(message)););// Event listener for incoming messagessocket.addEventListener(‘message’, (event) => const receivedMessage = JSON.parse(event.data); console.log(‘Received message:’, receivedMessage); // Handle the received message based on its type if (receivedMessage.type === ‘notification’) // Display a notification to the user alert(receivedMessage.text); );// Event listener for connection errorssocket.addEventListener(‘error’, (event) => console.error(‘WebSocket error:’, event););// Event listener for connection closuresocket.addEventListener(‘close’, (event) => console.log(‘WebSocket connection closed’););“` Server-side (Node.js with a WebSocket library like `ws`):“`javascriptconst WebSocket = require(‘ws’);const wss = new WebSocket.Server( port: 8080 );wss.on(‘connection’, ws => console.log(‘Client connected’); ws.on(‘message’, message => try const parsedMessage = JSON.parse(message); console.log(‘Received:’, parsedMessage); // Example: Echo the message back to the client ws.send(JSON.stringify( type: ‘echo’, text: parsedMessage.text )); // Example: Broadcast the message to all connected clients (except the sender) wss.clients.forEach(client => if (client !== ws && client.readyState === WebSocket.OPEN) client.send(JSON.stringify( type: ‘broadcast’, text: parsedMessage.text, sender: ‘Other Client’ )); ); catch (error) console.error(‘Error parsing JSON:’, error); ws.send(JSON.stringify( type: ‘error’, message: ‘Invalid JSON format’ )); ); ws.on(‘close’, () => console.log(‘Client disconnected’); ););console.log(‘WebSocket server started on port 8080’);“`These code examples illustrate the fundamental steps of formatting and transmitting data using JSON:
- The client establishes a WebSocket connection to the server.
- The client formats a message as a JavaScript object and converts it into a JSON string using `JSON.stringify()`.
- The client sends the JSON string to the server using `socket.send()`.
- The server receives the message and parses it into a JavaScript object using `JSON.parse()`.
- The server processes the message and, in this case, echoes it back to the client and broadcasts it to other clients.
- The server converts the response into a JSON string using `JSON.stringify()` and sends it back to the client using `ws.send()`.
- The client receives the JSON string, parses it into a JavaScript object using `JSON.parse()`, and processes the received message.
These are basic examples; real-world applications will likely involve more complex message structures, error handling, and data validation. The use of JSON simplifies the handling of data on both the client and server sides, contributing to the overall efficiency of real-time communication.
Authentication and Authorization
Securing real-time serverless applications is paramount to protect sensitive data and ensure the integrity of the system. Authentication verifies the identity of users or clients, while authorization determines their access rights to specific resources or functionalities within the application. Implementing robust authentication and authorization mechanisms is crucial for preventing unauthorized access, data breaches, and malicious activities. This section details the critical security considerations and implementation strategies for securing WebSocket-based serverless applications.
Security Considerations in Real-Time Applications
Real-time applications present unique security challenges due to their persistent connections and bi-directional data flow. The following are key security considerations:
- Data Confidentiality: Ensure that all data transmitted over WebSocket connections is encrypted, particularly when dealing with sensitive information. Utilize Transport Layer Security (TLS), also known as Secure Sockets Layer (SSL), to encrypt the WebSocket traffic. This protects data from eavesdropping and tampering.
- Authentication of Clients: Verify the identity of clients connecting to the WebSocket server. This prevents unauthorized access and allows for user-specific authorization. Authentication can be implemented using various methods, such as JWTs, API keys, or OAuth.
- Authorization and Access Control: After authenticating a client, determine what resources and functionalities they are permitted to access. Implement a role-based access control (RBAC) system or other authorization mechanisms to enforce these permissions.
- Protection against Cross-Site WebSocket Hijacking (CSWSH): Implement measures to prevent unauthorized access to WebSocket connections from malicious websites. This can involve validating the origin of the WebSocket connection and using appropriate security headers.
- Rate Limiting and Throttling: Prevent abuse by limiting the number of WebSocket connections or messages a client can send within a specific time frame. This helps to mitigate denial-of-service (DoS) attacks and other forms of abuse.
- Input Validation and Sanitization: Validate and sanitize all data received from clients to prevent injection attacks, such as SQL injection or cross-site scripting (XSS). This ensures that malicious code cannot be executed on the server.
- Regular Security Audits and Updates: Regularly audit the application’s security posture and update dependencies to address any vulnerabilities. Employ penetration testing and vulnerability scanning to identify and remediate potential security flaws.
Designing Authentication and Authorization for WebSocket Connections
A well-designed authentication and authorization system for WebSocket connections should be secure, scalable, and user-friendly. Here’s a design Artikel:
- Authentication Process:
- Clients initiate the authentication process, typically by providing credentials (username/password) or requesting an authentication token.
- The server validates the credentials or token.
- Upon successful validation, the server issues a secure token (e.g., a JWT) to the client. This token represents the client’s authenticated identity.
- The client includes the token in subsequent WebSocket connection requests (e.g., in the query parameters or headers).
- Authorization Process:
- When a client attempts to perform an action (e.g., sending a message to a specific channel), the server verifies the client’s authorization.
- The server extracts the user’s identity and associated roles/permissions from the token.
- The server checks if the user has the necessary permissions to perform the requested action.
- If the user is authorized, the action is allowed; otherwise, the request is rejected.
- Token Management:
- Use short-lived tokens to minimize the impact of compromised tokens.
- Implement token refresh mechanisms to extend the user’s session without requiring them to re-authenticate.
- Store tokens securely, ideally using HTTPS and secure cookies with appropriate flags (e.g., `HttpOnly` and `Secure`).
- Scalability Considerations:
- Choose a token format that is efficient to process and does not require database lookups for every request (e.g., JWTs).
- Consider using a centralized authentication and authorization service to manage user identities and permissions.
- Ensure that the authentication and authorization mechanisms can handle a large number of concurrent WebSocket connections.
Implementing Authentication with JWTs
JSON Web Tokens (JWTs) are a widely used and effective method for authenticating and authorizing WebSocket connections. JWTs are compact, self-contained, and can be easily passed between the client and server.
- JWT Structure: A JWT consists of three parts, separated by periods:
- Header: Contains the token type (e.g., JWT) and the signing algorithm (e.g., HS256, RS256).
- Payload: Contains claims, which are statements about the user (e.g., user ID, roles, permissions).
- Signature: A cryptographic signature that verifies the integrity of the token. The signature is created by signing the header and payload with a secret key or a private key.
- Authentication Flow:
- Client Request: The client provides credentials (e.g., username and password) to the server via a secure channel (e.g., HTTPS).
- Server Validation: The server validates the credentials. If valid, the server generates a JWT containing user information (e.g., user ID, roles) in the payload.
- Token Issuance: The server signs the JWT with a secret key and returns it to the client.
- WebSocket Connection: The client includes the JWT in the WebSocket connection request (e.g., in the query parameters or a custom header).
- Token Verification: Upon receiving a WebSocket connection, the server verifies the JWT:
- Verifies the signature using the same secret key.
- Checks the token’s expiration time.
- Validates any other claims (e.g., issuer, audience).
- Authorization: If the JWT is valid, the server extracts the user’s identity and roles from the payload and uses this information to authorize the client’s actions.
- Example: A simple example using Node.js and the `jsonwebtoken` library:
const jwt = require('jsonwebtoken'); const secretKey = 'your-secret-key'; // Store this securely // Generate a JWT function generateToken(user) const payload = userId: user.id, username: user.username, roles: user.roles, iat: Math.floor(Date.now() / 1000), // Issued at time exp: Math.floor(Date.now() / 1000) + (60- 60) // Expires in 1 hour ; return jwt.sign(payload, secretKey); // Verify a JWT function verifyToken(token) try const decoded = jwt.verify(token, secretKey); return decoded; catch (error) return null; // Token is invalid or expiredIn this example:
- `generateToken` creates a JWT containing the user’s ID, username, roles, and expiration time.
- `verifyToken` verifies the token’s signature and checks for expiration.
- Best Practices for JWT Implementation:
- Secure Key Management: Protect the secret key used to sign the JWTs. Never hardcode the key in the code; store it in environment variables or a secure configuration management system.
- Token Expiration: Set appropriate expiration times for JWTs. Short-lived tokens enhance security by limiting the window of opportunity for attackers. Implement refresh tokens to allow the client to obtain a new token without requiring the user to re-authenticate.
- HTTPS: Always use HTTPS to transmit the JWT, especially when it is initially issued and when refreshing it. This prevents eavesdropping.
- Token Storage: Store the JWT securely on the client-side, typically in local storage, session storage, or an HTTP-only cookie. Use the `HttpOnly` and `Secure` flags for cookies to mitigate the risk of cross-site scripting (XSS) attacks.
- Revocation: Implement mechanisms to revoke tokens when necessary (e.g., when a user logs out or when a security breach is suspected). This might involve maintaining a blacklist of revoked tokens or using a token revocation service.
- Claims: Include only the necessary information in the JWT payload. Avoid storing sensitive data in the token.
Scaling and Performance Optimization
Serverless WebSocket applications, by their nature, are designed for scalability. However, careful planning and implementation are crucial to ensure optimal performance as the user base and traffic volume grow. This section details strategies for scaling these applications and optimizing their performance, focusing on techniques that leverage the inherent benefits of serverless architectures while mitigating potential bottlenecks.
Scaling Serverless WebSocket Applications
Scaling serverless WebSocket applications involves automatically adjusting resources to accommodate fluctuating demand. This is typically handled by the serverless platform itself, but understanding the underlying mechanisms and best practices is vital for optimal performance and cost efficiency.
- Platform-Managed Scaling: Serverless platforms, such as AWS Lambda with API Gateway, Google Cloud Functions with Cloud Endpoints, or Azure Functions with Azure SignalR Service, automatically scale the underlying infrastructure. When a WebSocket connection is established, the platform provisions the necessary resources (e.g., function instances, connections). As the number of concurrent connections increases, the platform automatically spins up more function instances to handle the load.
- Horizontal Scaling: The primary scaling mechanism is horizontal scaling. This means adding more instances of the serverless function to handle incoming WebSocket connections and message processing. The platform manages the distribution of traffic across these instances, ensuring that no single instance is overloaded.
- Connection Limits and Throttling: Serverless platforms often have built-in connection limits and throttling mechanisms to prevent abuse and manage resource consumption. It is crucial to understand these limits and configure your application to gracefully handle situations where these limits are reached. This might involve implementing strategies such as connection queueing, load shedding, or rate limiting.
- Monitoring and Auto-Scaling: Implementing robust monitoring and auto-scaling configurations is essential. Monitoring tools should track key metrics, such as the number of concurrent connections, message throughput, function invocation duration, and error rates. Auto-scaling rules should be configured to automatically adjust the number of function instances based on these metrics. This ensures that the application can dynamically adapt to changing traffic patterns.
- Geographic Distribution: For applications serving users globally, consider deploying the serverless functions in multiple regions. This reduces latency for users closer to those regions, improving the overall user experience. Platforms like AWS CloudFront or Google Cloud CDN can be used to distribute WebSocket traffic to the nearest available function instance.
Optimizing WebSocket Performance
Optimizing WebSocket performance is crucial for providing a responsive and efficient real-time experience. This involves minimizing latency, maximizing throughput, and efficiently managing resources. Several strategies can be employed to achieve these goals.
- Connection Pooling: Connection pooling is a technique that reuses existing WebSocket connections instead of creating new ones for each request. This significantly reduces the overhead associated with establishing and tearing down connections, improving performance, especially when handling frequent connection establishment and teardown cycles. Implement connection pooling within the serverless function to efficiently manage WebSocket connections.
- Message Compression: Compress WebSocket messages to reduce the amount of data transmitted over the network. This can significantly improve performance, especially for applications that transmit large amounts of data. Consider using compression algorithms like `zlib` or `gzip` on the server-side and client-side.
- Message Batching: Instead of sending individual messages, batch multiple messages into a single payload. This reduces the number of network round trips and improves throughput. The optimal batch size depends on the application’s specific needs and network conditions.
- Binary Data Encoding: Use binary data encoding instead of text-based formats like JSON when possible. Binary formats are generally more compact and faster to parse, leading to improved performance. Protocol Buffers (protobuf) or MessagePack are examples of binary serialization formats that can be employed.
- Optimize Message Payload Size: Minimize the size of the data included in each message. This can involve careful data modeling, data compression, and selecting appropriate data types. Smaller message sizes translate to reduced network bandwidth consumption and faster message delivery.
- Server-Side Caching: Cache frequently accessed data on the server-side to reduce the need to fetch it from external data sources. This can significantly reduce latency and improve the responsiveness of the application. Consider using in-memory caching mechanisms like Redis or Memcached.
- Efficient Data Storage: Select a database or data store that is optimized for real-time data access and high throughput. Consider using a NoSQL database, such as DynamoDB or MongoDB, which are well-suited for handling large volumes of real-time data.
- Minimize Function Cold Starts: Cold starts can introduce latency, especially for serverless functions. Strategies to mitigate cold starts include:
- Provisioned Concurrency: Use provisioned concurrency to pre-warm function instances and reduce cold start times.
- Keep-Alive Connections: Maintain persistent connections to backend services and data stores.
- Optimize Code: Write efficient code and minimize dependencies to reduce function initialization time.
Error Handling and Monitoring
Real-time serverless applications, particularly those leveraging WebSockets, require robust error handling and comprehensive monitoring strategies. The distributed nature of serverless architectures, combined with the persistent connection model of WebSockets, introduces unique challenges. Implementing effective error handling and monitoring is crucial for maintaining application stability, identifying performance bottlenecks, and ensuring a positive user experience. This section delves into techniques for handling errors, monitoring application health, and setting up logging and alerting mechanisms tailored for serverless WebSocket applications.
Techniques for Handling Errors Within a Serverless WebSocket Application
Error handling in serverless WebSocket applications must account for various failure points, including client-side issues, server-side function errors, and network-related problems. A well-defined error handling strategy improves resilience and provides valuable diagnostic information.
- Client-Side Error Handling: Client-side applications should be designed to handle WebSocket connection errors gracefully. This involves implementing mechanisms to detect connection drops, handle connection timeouts, and attempt reconnection. Consider using exponential backoff strategies to avoid overwhelming the server during reconnection attempts. Furthermore, client-side applications should provide informative error messages to users, indicating the nature of the problem and potential solutions.
- Server-Side Function Error Handling: Serverless functions should incorporate robust error handling within their code. Implement try-catch blocks to handle exceptions that may occur during function execution. Log all exceptions, including detailed information such as stack traces and input parameters, to facilitate debugging. Return meaningful error responses to clients, providing context about the failure.
- WebSocket Connection Error Handling: Implement mechanisms to monitor the WebSocket connection status and handle connection errors. If a connection is lost, the server-side application should attempt to re-establish the connection. The server should also handle scenarios where a client abruptly disconnects, such as due to network issues or client-side crashes. Consider implementing ping/pong mechanisms to detect and handle idle connections.
- Error Propagation and Reporting: Establish a clear process for propagating and reporting errors across the application. When an error occurs in a serverless function, the function should log the error and, if necessary, send an error message to the connected clients. Consider using a dedicated error reporting service to collect and analyze errors from various components of the application.
- Idempotency and Retries: Design serverless functions and data operations to be idempotent, meaning that executing the same operation multiple times has the same effect as executing it once. This is crucial for handling transient errors and ensuring data consistency. Implement retry mechanisms with appropriate backoff strategies for operations that may fail due to temporary network issues or service unavailability.
Methods for Monitoring Application Health and Performance
Monitoring is essential for understanding the behavior of a serverless WebSocket application and identifying performance issues. Implementing a comprehensive monitoring strategy involves collecting metrics, analyzing logs, and setting up alerts.
- Metric Collection: Collect key metrics to track the performance and health of the application. These metrics include:
- WebSocket Connection Count: The number of active WebSocket connections.
- Message Throughput: The rate at which messages are sent and received.
- Latency: The time it takes for messages to be transmitted between the client and server.
- Error Rates: The percentage of requests that result in errors.
- Function Execution Times: The time it takes for serverless functions to execute.
- Resource Utilization: CPU, memory, and network usage of serverless functions.
Utilize cloud provider-specific monitoring services (e.g., AWS CloudWatch, Azure Monitor, Google Cloud Monitoring) to collect and visualize these metrics.
- Log Analysis: Centralized logging is crucial for understanding application behavior and troubleshooting issues. Implement logging in serverless functions to capture events, errors, and performance information. Use a structured logging format (e.g., JSON) to facilitate analysis. Employ log aggregation and analysis tools (e.g., AWS CloudWatch Logs Insights, Azure Log Analytics, Google Cloud Logging) to search, filter, and analyze logs.
- Tracing: Implement distributed tracing to track the flow of requests across multiple serverless functions. This helps identify performance bottlenecks and understand the interactions between different components of the application. Use tracing tools (e.g., AWS X-Ray, Azure Application Insights, Google Cloud Trace) to visualize request traces and analyze performance metrics.
- Real-time Monitoring Dashboards: Create real-time dashboards to visualize key metrics and application health indicators. These dashboards should provide a comprehensive overview of the application’s performance and allow for quick identification of issues. The dashboards should be accessible to the development and operations teams.
- Synthetic Monitoring: Implement synthetic monitoring to simulate user interactions and proactively identify potential issues. This involves creating scripts that simulate user behavior and monitor the application’s performance from different locations.
Detail How to Set Up Logging and Alerting for WebSocket-Related Events
Effective logging and alerting are critical for proactively identifying and responding to issues in a serverless WebSocket application. This involves defining log levels, configuring alerts based on specific criteria, and integrating with notification channels.
- Define Log Levels: Implement different log levels (e.g., DEBUG, INFO, WARN, ERROR) to categorize log messages based on their severity. Use appropriate log levels to provide context and reduce noise in the logs. Ensure that critical events, such as errors and connection failures, are logged at the ERROR level.
- Configure Logging: Configure logging within serverless functions to capture relevant information about WebSocket-related events. Log messages should include:
- WebSocket connection establishment and termination events.
- Message send and receive events.
- Errors and exceptions.
- Performance metrics, such as latency and throughput.
Use structured logging formats (e.g., JSON) to facilitate log analysis.
- Set Up Alerting Rules: Define alerting rules based on specific criteria to trigger notifications when issues arise. Alerting rules can be based on:
- Error rates exceeding a threshold.
- High latency values.
- WebSocket connection counts falling below a minimum threshold.
- Specific error messages in the logs.
Use cloud provider-specific alerting services (e.g., AWS CloudWatch Alarms, Azure Monitor Alerts, Google Cloud Monitoring Alerts) to configure and manage alerts.
- Integrate with Notification Channels: Integrate alerts with notification channels, such as email, Slack, or PagerDuty, to notify the development and operations teams when issues occur. Ensure that alerts provide sufficient context to allow for quick investigation and resolution. Configure notification preferences based on the severity of the alerts.
- Alert Escalation: Implement an alert escalation strategy to ensure that critical alerts are addressed promptly. This involves escalating alerts to different teams or individuals based on the severity of the issue and the time of day.
Advanced WebSocket Features

Real-time serverless applications can be significantly enhanced by leveraging advanced WebSocket features beyond basic connection establishment and message exchange. These features provide functionalities that are critical for building robust, scalable, and efficient applications, allowing for sophisticated communication patterns and improved user experiences. Understanding and implementing these advanced features is crucial for unlocking the full potential of WebSockets in a serverless environment.
Broadcasting and Multicasting
Broadcasting and multicasting are powerful communication patterns that enable efficient distribution of data to multiple clients simultaneously. They are essential for applications requiring real-time updates to a large number of users, such as chat applications, live dashboards, and collaborative tools.
- Broadcasting: Broadcasting involves sending a message from a single source to all connected clients. This is typically used for disseminating global updates, such as system-wide notifications or shared data changes. In a serverless architecture, this can be achieved by having a serverless function that receives a message and then forwards it to all connected WebSocket clients.
- Multicasting: Multicasting, on the other hand, involves sending a message from a single source to a specific group of clients. This is useful for applications where users are organized into groups or have specific roles, such as group chats or role-based access control in collaborative projects. Implementing multicasting requires managing client connections and routing messages to the correct subsets of clients.
The choice between broadcasting and multicasting depends on the application’s requirements. Broadcasting is simpler to implement but less targeted, while multicasting provides more control over message delivery but adds complexity in managing client groups.
WebSocket Subprotocols
WebSocket subprotocols extend the functionality of WebSockets by defining specific application-level protocols on top of the WebSocket protocol. They allow for the negotiation of specialized communication formats, such as binary data encoding, or the implementation of custom application protocols. This enhances the efficiency and flexibility of real-time communication.
Subprotocols are negotiated during the WebSocket handshake, where the client and server agree on a specific subprotocol to use for the connection. This is done by exchanging the Sec-WebSocket-Protocol header during the handshake. The use of subprotocols is optional, but it can be beneficial in various scenarios.
- STOMP (Simple Text Oriented Messaging Protocol): STOMP is a text-based messaging protocol designed for messaging over WebSockets. It defines a set of commands (e.g., CONNECT, SUBSCRIBE, SEND) for interacting with a message broker.
- MQTT (Message Queuing Telemetry Transport): MQTT is a lightweight messaging protocol commonly used in IoT applications. It provides a publish-subscribe model for efficient data transmission.
- Custom Protocols: Developers can also define their own custom subprotocols to meet specific application requirements. This involves defining the message format, encoding, and handling logic for the protocol.
Example of using STOMP with a serverless application:
1. Client initiates a WebSocket connection with a subprotocol header: Sec-WebSocket-Protocol: stomp
2. Server accepts the connection and responds with the same subprotocol header if it supports it.
3. Client and server exchange STOMP messages, such as subscribing to a topic ( SUBSCRIBE) and sending messages to the topic ( SEND).
4. The serverless function acts as a STOMP broker, routing messages to the appropriate subscribers.
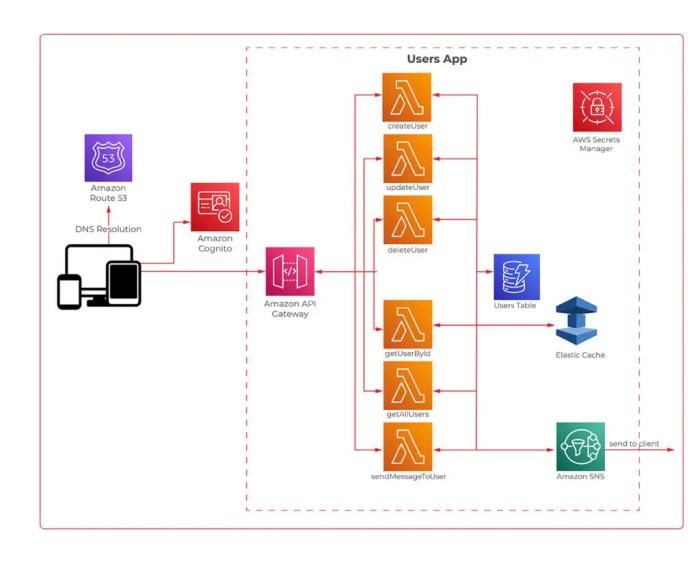
WebSocket Broadcasting Architecture
The following diagram illustrates a simplified architecture for WebSocket broadcasting in a serverless environment.
Diagram Description: The diagram depicts a system for broadcasting messages from a single source to multiple connected clients via WebSockets. The architecture is built upon a serverless infrastructure, leveraging the scalability and cost-efficiency of such a setup.
Components:
- Client Applications: Represented as multiple individual boxes, each symbolizing a client application (e.g., web browser, mobile app) connected to the WebSocket server. These clients subscribe to receive real-time updates.
- API Gateway: A central component responsible for handling incoming WebSocket connections and routing messages to the appropriate backend service. It acts as the entry point for all WebSocket traffic.
- Serverless Function (Broadcaster): A serverless function that processes incoming messages, which can originate from various sources (e.g., user actions, database updates, external APIs). Upon receiving a message, the function broadcasts it to all connected WebSocket clients. The function might also handle message transformation or filtering before broadcasting.
- WebSocket Connections (bidirectional arrows): Represent the persistent, real-time communication channels established between the API Gateway and the client applications. Data flows bi-directionally through these connections.
Workflow:
- A client application establishes a WebSocket connection through the API Gateway.
- The API Gateway receives the connection request and establishes a persistent WebSocket connection with the client.
- A message originates from a source (e.g., a user action, database update).
- The message is sent to the serverless function (Broadcaster) via the API Gateway.
- The serverless function processes the message (e.g., transforms it).
- The serverless function uses the API Gateway to send the message to all connected clients.
- Each client receives the message and updates its display accordingly.
This architecture allows for efficient broadcasting of messages to a large number of clients, providing real-time updates for various applications.
Deployment and Testing
Deploying and rigorously testing a serverless WebSocket application is crucial for ensuring its reliability, scalability, and overall performance. This section provides a structured approach to deploying and testing such applications, covering essential checklists, testing methodologies, and best practices. Proper testing helps identify and rectify potential issues early in the development lifecycle, preventing costly problems in production.
Deployment Checklist
The deployment process requires a systematic approach to minimize errors and ensure a smooth transition from development to production. This checklist Artikels the essential steps to follow:
- Code Review: Before deployment, conduct a thorough code review to identify potential bugs, security vulnerabilities, and performance bottlenecks. This should involve multiple developers and adhere to established coding standards.
- Infrastructure as Code (IaC): Utilize Infrastructure as Code (IaC) tools like AWS CloudFormation, Terraform, or Serverless Framework to define and manage your serverless infrastructure. This enables repeatable and consistent deployments, version control, and automated updates.
- Environment Configuration: Configure environment-specific settings such as API keys, database connection strings, and region settings. Employ environment variables to avoid hardcoding sensitive information within the code.
- Build and Package: Automate the build and packaging process to create deployable artifacts. This typically involves compiling code, bundling dependencies, and creating deployment packages.
- Testing: Run a comprehensive suite of tests, including unit tests, integration tests, and end-to-end tests, to validate the functionality of the application. Testing should be performed in a staging environment before deploying to production.
- Deployment to Staging: Deploy the application to a staging environment that closely mirrors the production environment. This allows for final testing and validation before releasing to production.
- Production Deployment: Once testing in the staging environment is successful, deploy the application to the production environment. Implement deployment strategies like blue/green deployments or canary releases to minimize downtime and risk.
- Monitoring and Logging: Implement comprehensive monitoring and logging to track the application’s performance, identify errors, and gather insights into user behavior. Use tools like AWS CloudWatch, Datadog, or New Relic.
- Rollback Strategy: Define a clear rollback strategy to revert to a previous version of the application in case of deployment failures or critical issues. This involves having a backup of the previous working version and a documented process for restoring it.
- Documentation: Maintain comprehensive documentation, including deployment procedures, configuration details, and troubleshooting guides. This documentation is crucial for operational efficiency and knowledge sharing within the team.
Testing Tools and Techniques
Testing a real-time application demands specific tools and techniques to ensure its functionality, performance, and reliability. Different tools cater to different testing needs.
- Unit Testing: Unit tests focus on individual components or functions. Frameworks like Jest (for JavaScript) or JUnit (for Java) are used to isolate and test specific pieces of code. For example, a unit test could verify the correct handling of a WebSocket message.
- Integration Testing: Integration tests verify the interaction between different components of the application, such as serverless functions, databases, and external APIs. Tools like Postman can be used to simulate WebSocket connections and send/receive messages to test the interaction between different services.
- End-to-End (E2E) Testing: E2E tests simulate user interactions from the client-side, verifying the complete workflow of the application. Tools like Cypress or Selenium can automate browser interactions and test the real-time aspects of the application, such as message delivery and responsiveness.
- Performance Testing: Performance testing assesses the application’s ability to handle a specific load. Tools like JMeter or Artillery can simulate multiple concurrent WebSocket connections to measure latency, throughput, and resource utilization. For example, testing how many concurrent users the application can support before performance degrades.
- Load Testing: Load testing identifies the application’s breaking point and its behavior under extreme loads. This helps determine the application’s scalability limits.
- Security Testing: Security testing validates the application’s security measures, including authentication, authorization, and data protection. Tools like OWASP ZAP can be used to identify vulnerabilities, such as Cross-Site Scripting (XSS) or SQL injection, within the WebSocket communication.
Best Practices for WebSocket Testing
Effective WebSocket testing requires following specific best practices to ensure accurate and comprehensive testing.
- Simulate Real-World Scenarios: Test the application under realistic conditions, simulating various network conditions (e.g., high latency, packet loss) and user behaviors (e.g., frequent disconnections, unexpected messages).
- Test Message Types and Formats: Verify that the application correctly handles different message types (e.g., text, binary) and formats (e.g., JSON, Protocol Buffers). Ensure that messages are correctly parsed and processed.
- Test Connection Management: Thoroughly test the connection establishment, disconnection, and reconnection mechanisms. Verify that the application handles connection errors and disconnections gracefully.
- Test Scalability and Concurrency: Use load testing tools to assess the application’s ability to handle a large number of concurrent WebSocket connections. Monitor resource utilization (e.g., CPU, memory, network) to identify potential bottlenecks.
- Test Security Aspects: Test authentication and authorization mechanisms to ensure that only authorized users can access the application. Verify that sensitive data is protected during transmission.
- Automate Tests: Automate as much of the testing process as possible, using tools like CI/CD pipelines to run tests automatically whenever code changes are made. This ensures consistent and reliable testing.
- Monitor and Analyze Test Results: Monitor test results and analyze them to identify areas for improvement. Use metrics such as response time, error rates, and throughput to evaluate the application’s performance.
- Version Control and Test Data: Use version control for test scripts and data. This ensures that tests can be easily replicated and that changes can be tracked and reverted if necessary.
Final Wrap-Up
In conclusion, building real-time serverless applications with WebSockets requires a thoughtful approach, integrating various technologies and architectural patterns. This journey has illuminated the key steps, from understanding the fundamentals of WebSockets and serverless platforms to implementing robust authentication, scaling strategies, and advanced features. The discussed techniques, including deployment and testing methodologies, equip developers with the knowledge to build efficient, scalable, and responsive applications.
As the demand for real-time interactivity continues to grow, mastering these concepts becomes increasingly vital for modern web development.
Commonly Asked Questions
What is the main difference between WebSockets and HTTP?
HTTP operates on a request-response model, where the client initiates each communication. WebSockets, however, establish a persistent, full-duplex connection, allowing for real-time, bidirectional data transfer without repeated requests.
What are the security considerations for WebSockets?
Security involves several aspects: secure WebSocket (WSS) for encrypted communication, proper authentication and authorization to control access, input validation to prevent vulnerabilities like cross-site scripting (XSS), and regular monitoring for suspicious activity.
How does connection pooling improve performance in WebSocket applications?
Connection pooling reuses existing WebSocket connections instead of establishing new ones for each request. This reduces overhead, minimizes latency, and improves resource utilization, leading to faster and more efficient data transmission.
What are some common use cases for real-time serverless applications?
Common use cases include chat applications, live dashboards, collaborative tools, real-time gaming, financial trading platforms, and IoT device communication, all of which benefit from instant data updates.
How do I handle client disconnections in a WebSocket application?
You must implement logic to detect and handle client disconnections. This involves monitoring connection states, using heartbeat mechanisms to detect inactivity, and removing disconnected clients from active connection lists to prevent resource leaks.